Thursday, May 30, 2013

DIY mini brown paper and doily snack bags


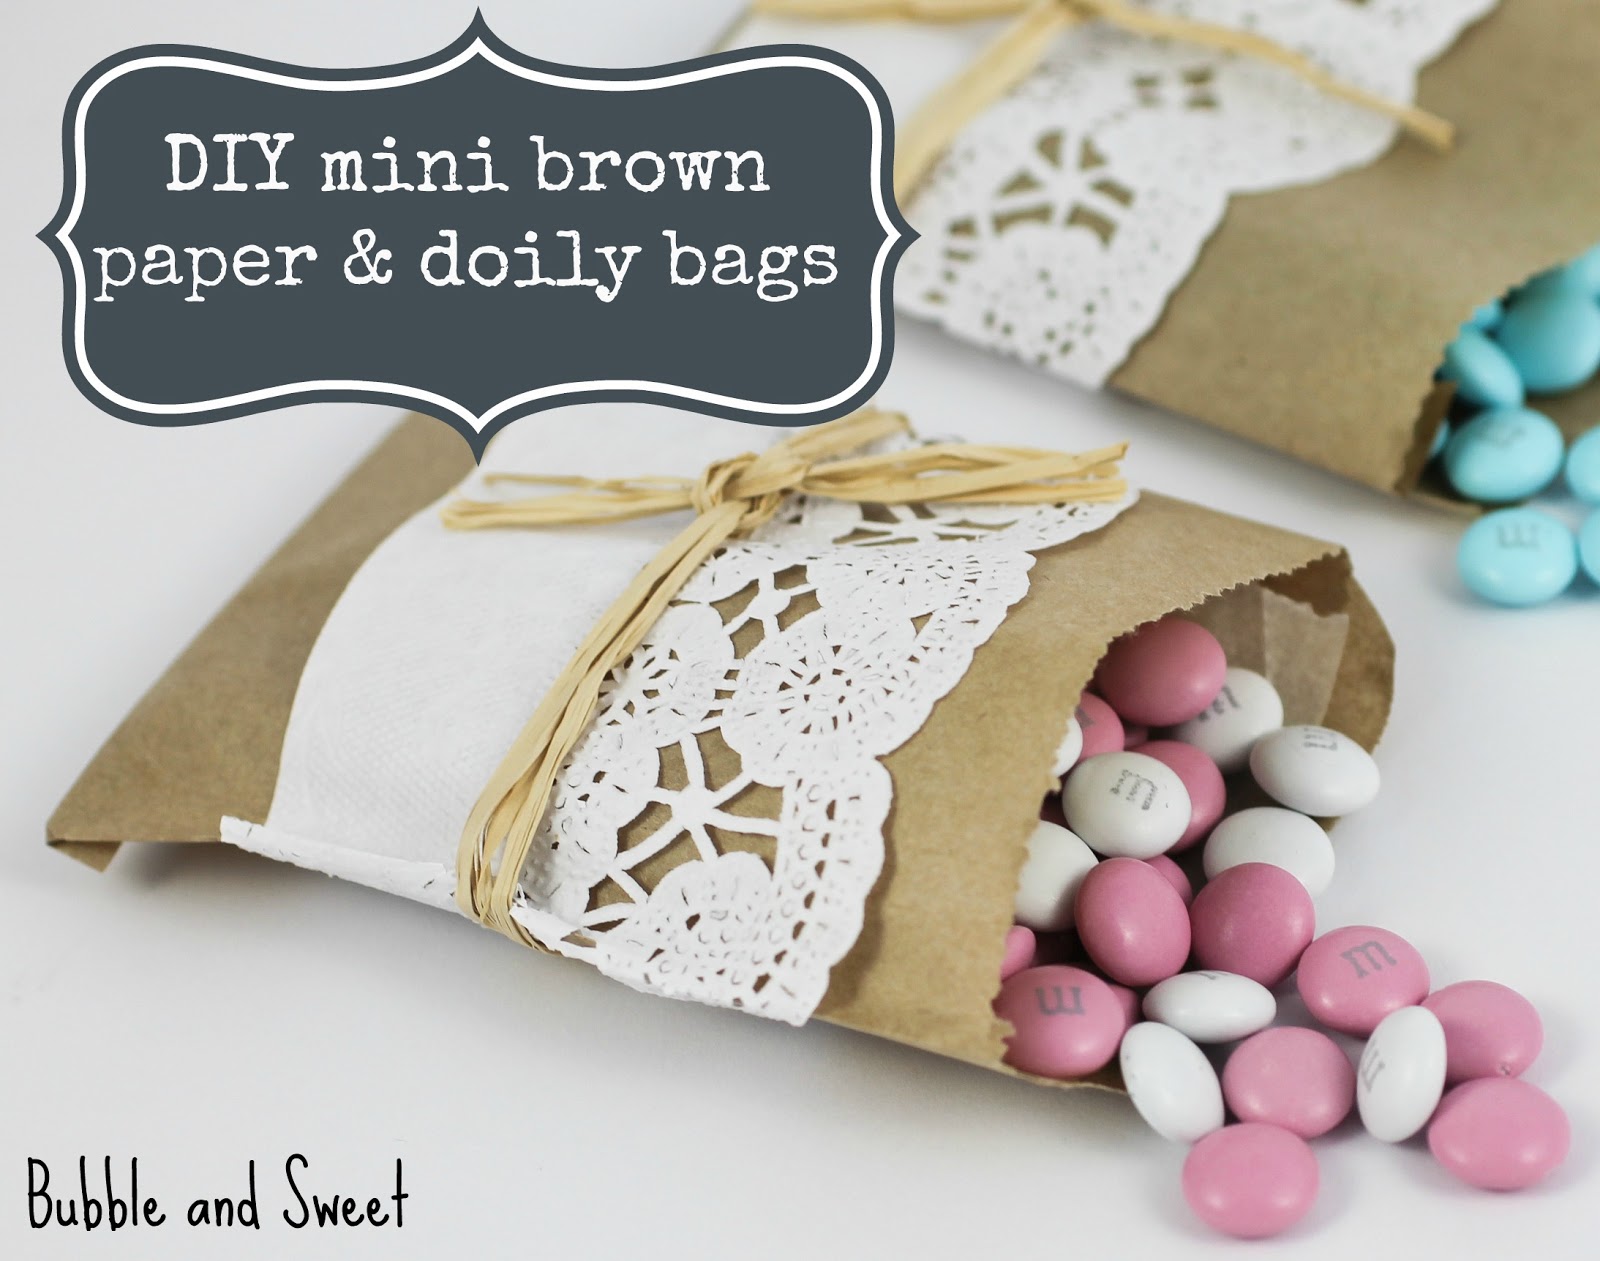
So it seems lots of people thought the little handmade brown paper bags that I popped my sugar spiced pecan cranberry popcorn mix in were a bit cute so I'm doing up a tutorial on how to make them below.

I'm not actually big on craft and do it more out of.....uh saying necessity would be wrong, perhaps lack of forward planning and cheapness might be more accurate. The idea for these bags came about something like this.

Hmmmm I've made up this yummy pecan nut mix and it is REALLY good but just photographing a pile of sticky looking pecans might not convey just how good so how can I make it look better in the photo's. I've just had a look in my 'prop' cupboards and nothing is really cutting it.


Oh-oh it's 6 o'clock now and the kids will be up soon, I better hurry. Think...think. Brown paper bags,yes you serve nuts in bags. But I only have big ones or these kinda cool envelopes that tie up with string, oh I like those and forgot I had them, nice! (Tie up and untie little envelopes)....focus I need little bags. Doh why don't I just cut my big ones down.

Double oh-oh one of the kids is awake. Sure sweetie we can make blueberry pancakes. 

So I did it - well both of the it's. In between making pancakes I cut down my savings brand brown paper bags and used some double sided tape to stick the the bags back together on the sides that needed sticking.

They still looked a little boring so I thought I would add some paper doiles and tie them up with a little paper twine I had saved.......and the end result looked pretty good in my picture with the nuts spilling out if I do say so myself ;) Well definitely better than a pile of sticky looking nuts.

Pretty swish for something I whipped up during breakfast. I've given really simple instructions on how I made the bags down below.

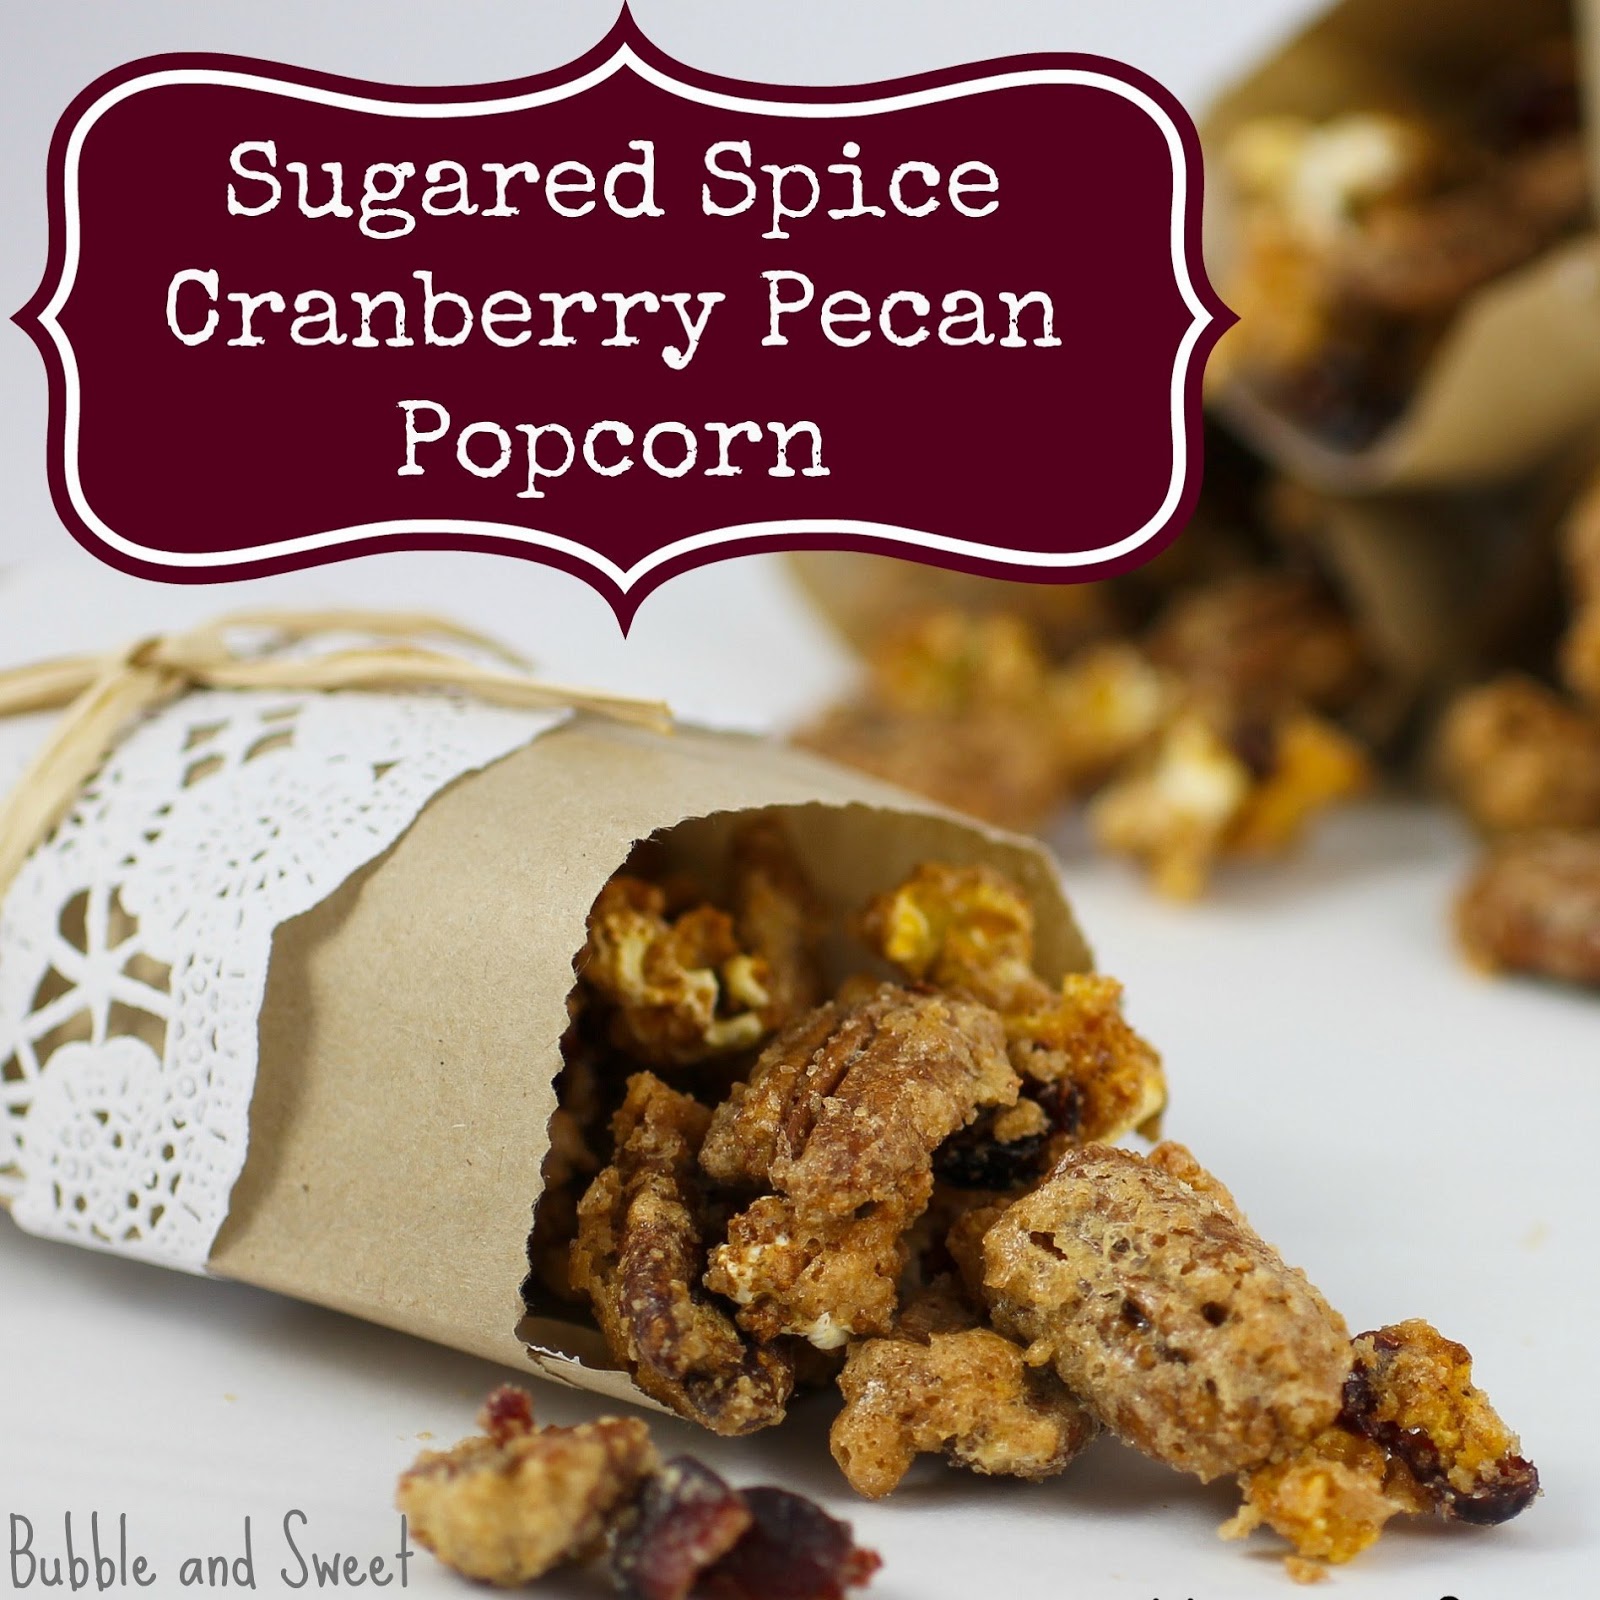
Yummy Sugar Spice Cranberry Pecan Popcorn Mix - Recipe HERE


Jo Totes Camera Bag Giveaway

Quick reminder if you want a chance to win a Jo Totes Camera Bag the giveaway finished Friday 31st (Australian EST) - CLICK HERE for link


DIY mini Brown Paper Doily Bags
Finished bag are approx 10cm (4") X 13cm (5")

You'll need:
Regular sized paper bags
scissors
double sided tape
oval doilies (mine were 22cm (8 3/4"0x 14.5cm (5 3/4")
twine or paper string
(optional hot glue for adhering string to back of bag)


Make up your own mini brown paper bags by cutting a regular bag into quarters.

Trim off a half a cm (1/4") from the bottom and side of the top 2 bags and then trim the corners (see picture below bottom left) so that you can fold together to make a neat bag. Use double sided sticky tape (I cut my double sided tape in half lengthways as it was a little too wide) and then fold the sides over to secure, Press down with a ruler to make the folds/edges sharp and neat. Make sure you have trimmed a triangle off the top corner so that the shape and opening of the top look the same as the original regular size bag.

For the bottom 2 quarters you will need to trim half a cm (1/4") from the one long open side and use the tape down that one side and fold it over to make a mini bag. I then cute half a cm (1/4") from one side of the top of the bag and a little triangle at each side of the top to make the shape and opening of the top look the same as the original regular size bag.


Adhere a lace doily to the mini brown paper bag.

Trim doily to size - mine were large oval doilies I picked up at a discount store so I cut them in half. Use double sided tape to adhere the doily to the bag, making sure you fold the edges neatly (use a ruler to press flat if you need) over and stick the back edges in place.

Finish by tying some twine, paper string or jute around the bag. Use a little glue on the back or tape to stick it in place.


There you have it super cute little bags that can make anything from M&M's to sugared nuts look even better.


Linda Vandermeer is a blogger, baker, maker and author of the cookbook ' Sweets on a Stick': More than 150 kid friendly recipes for cakes, candies, cookies and pies on the go!. Published in the US the book is available at most online book stores:

Link to Amazon:

Or at Fishpond (free shipping Australia)
Sweets on a Stick: More Than 150 Kid-Friendly Recipes for Cakes, Candies, Cookies, and Pies on the Go! 

Sunday, May 26, 2013

Sugar spice cranberry pecan and popcorn mix

Quick- must Pin or Bookmark this! It makes fabulous gifts for Father's day or Christmas ;)

The weather has turned and it's cold all of a sudden. Plus windy and rainy....brrrrr.

I'm not a cold loving person unlike Mr Sweet who spent a good deal of his youth in Canada. Although he does love the beach he grumbles his way through hot summer nights, more often than not turning on the air-conditioning while I huddle for warmth under the covers.

In fact the first time I was snowed on as a teenager, even though it was ever so lightly, I cried from the cold. Of course I have toughened up now and worked out that tears do not actually help warm you up. Also there is much to be said for warming up next to a fireplace and drinking hot chocolate with marshmallows. Every (snow)storm has it's silver lining.


Another benefit of cold weather is that the wonderfully frangrant smell resulting from baking anything with spices seems doubly enticing. Add some rainy weather and it might just quadruple.

Anyhoo snow is unheard of around here but it certainly has been wet and windy which made baking this late night experiment even more fun.


Mr Sweet's mother has been gifting us with an almost endless supply of dried cranberries and for some reason when I received the last batch I thought they would be a fabulous addition to sugar and spice pecan nuts.

So off to the shop I popped to buy the pecans which oh my goodness were so expensive. With 3 kids sometimes I have to be economical so I decided to replace half of my old recipe with popcorn :)

Anyhoo the finished produce was quite delicious with the lightly tart cranberries a lovely contrast to the sweet and sugary spiced nuts. (recipe below).


Win A Camera Bag 

Don't forget I have a super competition for Australian and New Zealand residents to win a gorgeous Jo Totes Camera bag from Cambags (CLICK HERE to hop over to the competition post).


Cranberry spice pecan popcorn
Makes around 3 cups. If you like you can use omit the popcorn and cranberries and just make regular sugar spiced nuts.

1 1/2 cups pecan nut halves already shelled
1 1/2 cups popcorn already popped (mine was microwaved buttered)
1/2 cup dried (sweetened) cranberries
1 egg white
1 tsp vanilla extract
1/2 cup sugar
1/2 tsp ground cinnamon


Preheat oven to 175C (350 F). Line a tray with baking paper (parchment paper).

In a large bowl mix together the pecans, popcorn and cranberries.

In a small bowl whisk the egg white with a fork until a little frothy, add the vanilla and whisk for another 15 or so seconds until well combined and frothy.

Pour over nut mixture and mix quickly until evenly distributed, add the sugar and cinnamon and mix well.

Spoon the mixture onto the prepared baking tray and pop in oven for 22 - 28 minutes mixing with a gentle folding method every 5 or so minutes.

Allow to cool before eating (well in theory I might not always do that). Can be stored for a week in an airtight container at room temperature.


Linked to:

I'm Lovin' it @ Tidy Mom

Sunday, May 19, 2013

Easiest Layered Pannacotta Ever


This is the easiest layered pannacotta you will ever make. Seriously, EVER!

Plus to make it even easier I am making my You Tube debut, and to keep it interesting as well as easy try and count how many times I say Okay.


Okay now where was I, yup easy, pretty much you just heat up a couple of ingredients, mix stuff together, strain it, pour it into containers and it sorts itself into layers.


I told you it was easy. It was a happy accident when I messed around with a recipe a few years back. The original recipe was not layering but my version was super layering awesomeness.

I've fancied them up by using mini square cups and popping a macaron shell and a bit of whipped up ganache onto the top. It's a perfect way to serve pannacotta for a buffet or dessert table.

Otherwise you can make it like a regular pannacotta and pour the mixture into dariole molds to turn out, or even just serve in ramkins or glasses.


Coffee Pannacotta makes 16 small serves (like in the picture) or 6 regular serves, recipe can be doubled or halved. Important notes included at bottom of recipe re cream and gelatin. I used low fat milk, you can use full fat if you like.

55g caster sugar (1 7/8 ounce)
20g (3/4 ounce) freshly ground coffee (mine was ground for espresso machine)
270gm (9 1/2 ounce) milk
2 and a half leaves gelatin
270gm (9 1/2 ounce) unthickened pouring cream

Place gelatine into a bowl and cover with cold water whilst you heat the milk (I usually ripe the sheets into 2 or 3 pieces so they are smaller and fit into a small bowl).

Pop sugar, milk and coffee into a saucepan and bring to a simmer stirring occasionally to dissolve the sugar, remove from heat.

Squeeze excess water from gelatin, discard the water and add the leaves to the milk mixture and stir to dissolve all gelatin.

Add cream and stir well.

Get a large jug with a handle and place a sieve over the top lined with 4 layers of muslin. If you do not have muslin you may use clean unused dishcloths or even a coffee filter or paper towels. Pass the coffee mixture through the lined sieve into the jug. Ensure as much of the mixture as possible gets through, you may need to replace the top layer if it becomes clogged.

Pour mixture into molds to achieve the separate layers I allowed the smaller containers to sit at room temperature for around 10 minutes or so until the layers are evident.

Allow to set in the fridge overnight covered with plastic or in an airtight container.


Serve in container or if you are turning out run a knife carefully around the edge and then gently warm the top with a dishcloth soaked in warm water before placing the plate on top of the mold and then turning both over. The pannacotta should slip out perfectly.

Cute chalkboard flags from Ah-Tissue

Notes for recipe - the weights for the liquids are actually weights on a set of electric scales.

Use unthickened cream - in Australia Thickened cream has added gelatin so you are changing the ratios and may end up with a panna cotta that is harder and more set than you intend. I use the Pauls brand of Pure cream in the blue carton it is 36.5% fat. In the US try whipping or heavy cream.

The gelatin brand I used says on the front Rheingold schnell-losliche Blatt-Gelatine it is light blue on the front and white with lots of darker blue writing on the back. I believe it is a normal strength gelatin sheet.  If you use a different strength gelatin it will have an impact on how the panna cotta sets but not the taste.

If your searching for the small square cups I suggest searching under disposable square cups or square verrine cups.

Dariole molds are available in kitchen and baking stores. The ones I normally use are small single plastic molds, so pretty much it is a fancy way of saying little plastic cups.


Linda Vandermeer is a blogger, baker, maker and author of the cookbook ' Sweets on a Stick': More than 150 kid friendly recipes for cakes, candies, cookies and pies on the go!. Published in the US the book is available at most online book stores:

Link to Amazon:

Or at Fishpond (free shipping Australia)
Sweets on a Stick: More Than 150 Kid-Friendly Recipes for Cakes, Candies, Cookies, and Pies on the Go! 


Thursday, May 16, 2013

Pumpkin, ginger, orange and carrot soup for Food Revolution Day


Have you heard? Friday the 17th of May is food revolution day! All the cool kids are talking about it.

Well Jamie Oliver is anyhoo and we all know he is kinda cool.

So word is not enough people are eating fresh and healthy food and we need to get it out there that y'all should be.

 
No seriously! Seeings as pretty much I post about desserts all the time I felt an obligation to join in.....

I know I have mentioned a couple of times that we generally eat pretty healthy for our regular meals. I just do not buy premade food, oh unless it's tomato sauce for spaghetti meat sauce or tinned tomatoes. Pretty much everything else I make from scratch.

It's healthier, it's cheaper and it just plain tastes better most of the time.


OK I hear you - it seems hard when your working full time and I don't envy anyone in that position. But I'm typing this at 9pm at night and I have some spaghetti sauce simmering on the stove. Yes like I said it's a premade sauce, but pretty much it's tomatoes, and first I sauteed some carrot and zucchini (courgette) before I cooked the (heart smart) mince meat. Maybe I added some bacon as well (shhh). It'll freeze up to make 2 family meals I that I can reheat, cook up the pasta and serve with a salad for an easy weekday meal soon.

Y'all didn't think I kept my figure by eating chips and burgers all day :) Something has to round out those macarons.

Anyhoo - I joined in the Food Bloggers Soup Challenge and just like everyone else in real life I just didn't have time to cook when it came to it. The box of vegetables from Aussie Farmers Direct was delivered like clockwork on the afternoon of the 15th and we all know Food Revolution Day is the 17th May.


Umm it seems we don't all know that - in my mind I was thinking the 19th for some reason, so some of my fabulously well though out ideas had to go - but I think that worked out for the best in the end as you can see that with half an hour and what I was given I whipped up a soup which with some bread fed the family.

Healthy, affordable and a well fed family. What more could I ask for.


For more information on what Food Revolution day is all about check out the Food Revolution Day website.


Pumpkin, Ginger, Orange and Carrot Soup

dash of olive oil
1 pumpkin (mine weighed 1.5kg whole) peeled and cut into cubes
2 carrots, peeled and cut into chunks
1 tbsp grated ginger
1 orange (zest and then juice)
750 ml/ 3 cups (US 3 1/5 th cups - but it's all approx) vegetable stock

Heat large saucepan to medium high and add dash of olive oil, pop in the pumpkin and carrot and cook for 10 minutes, add ginger and cook further 5 minutes. Add the vegetable stock and orange juice and cook for further 20 minutes. Use a stick blender to blend soup until smooth.

Serve with a swirl of cream or low fat yogurt, a sprinkle of marinated feta, shredded basil and pepper to taste.

Parmesan and Basil Crisps

Grate a couple of tablespoons of Parmesan cheese in a bowl and shred in some basil (to taste) shape into circles on a tray lined with parchment paper and bake in a preheated oven at 200 C until crisp and golden.


Disclosure note: I received a box of seasonal vegetables from Aussie Farmers Direct.

Linda Vandermeer is a blogger, baker, maker and author of the cookbook ' Sweets on a Stick': More than 150 kid friendly recipes for cakes, candies, cookies and pies on the go!. Published in the US the book is available at most online book stores:

Link to Amazon:

Or at Fishpond (free shipping Australia)
Sweets on a Stick: More Than 150 Kid-Friendly Recipes for Cakes, Candies, Cookies, and Pies on the Go! 

Sunday, May 12, 2013

Raspberry Marshmallow Fudge with sprinkles AKA I heart mum fudge


This fudge is made from the heart...... and made with heart (sprinkles).


Delicious marshmallowy chocolate based fudge flavored with raspberry, dotted with swirly marshmallows and sprinkled with cute sugar hearts, it's as pretty to look at it is yummy to eat.


I came up with this fudge recipe for The Destroyer's kindi groups mother's day gift stall.

Originally I was going to make macarons 'cause y'know everyone loves them, but then I realised 4 year olds would be carrying the gifts home in school bags. There was no way those delicate treats would make it.

Yup it just wasn't going to work out.


So I went with fudge. It's sturdy, it tastes great, it looks good, it lasts well, it packs up nice, most everyone loves it. It ticked all the boxes.

So fudge. It was decided.


But I wanted to make up a special recipe for mothers days because....well duh! Mums are special.

Plus it had to be pretty to entice all those kindi kids.


In fact I did my job a little too well. I sent The Destroyer off with his money and he came home with.......fudge that I made. The teachers had tried to reason with him but he could not be swayed. That pink fudge with heart sprinkles and a pink bow was irresistible :)

 
The raspberry flavour for this fudge comes from a bottle. I know, I know, oh my goodness your thinking 'does this woman ever use anything fresh'. Well in fact I do and most of the meals we eat in this household are based on fresh fruit, vegetables, lean meat and dairy. However by using the oil flavouring the fudge is less perishable and lasts longer, which means you can take your time eating it if you want.
 

Oh and if you like fudge you should also check out my Peppermint Cookie Fudge recipe (CLICK HERE).

Rapberry Marshmallow fudge
makes 20 large pieces or 60ish small pieces - the ones in the picture are large.

200g (7oz) white marshmallows
1 1/2 cup white sugar
2/3 cup evaporated milk (not low fat)
1/4 tsp salt
250 g (9 oz ) white chocolate chopped into very small pieces
170 g dark chocolate (6 oz semi sweet) chopped into very small pieces
85 g milk chocolate (3 oz) chopped into very small pieces
1/2 tsp raspberry essence*
 few drops pink food colour (I use gel food color)
1 cup marshmallows extra cut into quarters (or mini marshmallows) for top
couple tablespoons heart sprinkles (optional)

*do a taste test as there is a big variance between different brand and types of essences


Line a 20cm X 20cm (8" X 8") square tin with foil.

Place the white chocolate into a largish bowl with 1/4 tsp raspberry essence and pink food colour.

Combine the dark (semi sweet) and milk chocolates together in another bowl and add the remaining 1/4tsp raspberry essence.

Pop 200 grams (7oz) marshmallows, sugar, evaporated milk and salt into a saucepan on medium low heat, stir until the marshmallows melt. Stir the mixture over the heat for another 5 to 7 minutes, do not allow it to boil.

Pour half the marshmallow mixture into the bowl with white chocolate and the other half into the bowl with the combined dark (semi sweet) and milk chocolates. Allow to sit for a minute or 2.

Using electric mixer beat the chocolate fudge mixture for a couple of minutes at low speed. All the chocolate should be melted.

 
Spoon the mixture into the prepared tin using the back of the spoon to level the mixture until it looks pretty smooth

Using a spoon or whisk mix the white chocolate mixture until all the chocolate pieces have melted. Spoon carefully onto the darker chocolate mixture and using the back of a spoon level the mixture until smooth.

Press in the extra marshmallows, I sprinkled mine over and then pushed them in to cover with the fudge. Add as much or as little as you like.

Then shake the heart sprinkles over gently so you don't get too many clumping together. I lightly pressed them onto the fudge to ensure they would stick.

Cover with plastic wrap and leave overnight to set.

Cut into squares with a sharp knife to serve. I measure where I want to cut with a ruler first for kinda even pieces. To get a clean edge run the knife under hot water and wipe clean between each slice.


Linda Vandermeer is a blogger, baker, maker and author of the cookbook ' Sweets on a Stick': More than 150 kid friendly recipes for cakes, candies, cookies and pies on the go!. Published in the US the book is available at most online book stores:

Link to Amazon:

Or at Fishpond (free shipping Australia)
Sweets on a Stick: More Than 150 Kid-Friendly Recipes for Cakes, Candies, Cookies, and Pies on the Go!